Friday, October 28, 2011

Leftovers, Anyone?

In previous blogs I've written about an Asian salad, manly meatloaf and a cauliflower side dish.  As with any dish, if you make too much you have leftovers.  Let me tell you, my Mom was an artist with leftovers and I like to think I inherited her skill in that department.  

After making the salad on one day, I had 3/4 of a head of green cabbage left over.


I used what little was left of this blend and the remainder of the head of green cabbage.
After making, eating and using slices for sandwiches for Hubby's lunch, I still had 1/2 of a meatloaf left

Have any ideas what to do with one full serving of the cauliflower side dish?
 
What to do with these three odd leftovers?  Well here's what I did....

I poured a little water into a skillet the put in a vegetable steamer.  I shredded the cabbage into thin slices and put a layer down on a vegetable steamer.  I sprinkled in what was left of the cauliflower and topped it with the leftover meatloaf, cut into strips.  Then I put another layers of shredded cabbage on top.

I fired up the stove and let it all steam.  When the cabbage began to wilt I gave it a nice sprinkling of kosher salt and coarsely ground black pepper.  I let it steam a little longer until the cabbage was softened and the meat was heated through.

I tossed it all together and served it as a "hot salad" for dinner.  As the coating from the meatloaf gave the cabbage a little zing, the cauliflower added the needed buttery creaminess.  The meat added protein and substance to the dish.  Even though  I had to put it all in a skillet and steam it, all the main parts were already done.  I took left overs of three seperate dishes and got a tasty fourth dish out of them.  I love when that happens!  My hubby asked if this was a "new recipe"  Of course I told him I'd been working very hard all day in the kitchen developing the recipe....Ha!

If I had any idea how satisfying it was going to turn out, I would have taken pictures!  I can only hope my description provided you with adequate visuals.

So go forth, my culinary cohorts, be fearless!  Throw those leftovers together and see what happens!

As always, your comments, ideas and individual results are welcomed and encouraged!

Wednesday, October 26, 2011

Cauliflower incognito! A scrumptuous side dish.

Let's face it, there isn't a person alive who thinks cauliflower is a sexy vegetable.  Today I saw recipes for Halloween Brains Dip using cauliflower as the storage container.  Ewwww!

Well don't fret my little foodies!  I have a simple way to fix it that I guarantee you'll love.  It involves Parmesan and butter, which begs the question:  How bad could it be??

Go ahead, be brave and buy an entire head of cauliflower at the store!  For those of you who only purchase prepackaged veggies, here's what a "whole cauliflower" looks like ;-)  Yes, you can use prepackaged cauliflower but it won't be as fresh.


Wash that puppy, peel/snap off the leaves and large stem.  You'll want to use a knife to get the core out of the middle.  Once this is done, snapping off the florets is easy.  Steam them or nuke them, it's up to you.  I prefer steaming them only because I can check them for tenderness easier than in the microwave.  
 
While they are steaming, grate about 1/4 to 1/2 cup of Parmesan cheese with a microplane and have 2-3 Tbsps of butter handy.  Once the cauliflower is done, mash it, puree it or take an immersion blender to it, just get it to the consistency of mashed potatoes.  It doesn't matter if you like them smashed or creamy, either way will work.  Once mashed add the cheese and butter, blend well.  Salt to taste.  Go easy on the salt though as the cheese is a bit salty all by itself.  If you like it creamier and calories aren't a concern, you can add cream, milk or more butter, a little at a time, until you reach the desired consistency.
It's also pretty tasty cold!  It's not exactly colorful but makes up for it in flavor.  Next time I'll throw in some chopped chives for color and bite.  Simple side dishes can really elevate a mundane main course.  This cauliflower side really does the trick!

NOTE:  If you want to take it a step further and really impress, mix some panko bread crumbs with softened butter.  Put the pureed cauliflower in a buttered baking dish and top with the crumb mixture.  Bake at 375-400 until the crumbs are golden brown.   It will only take a few minutes to brown so watch it!   Serve that puppy up! 


Thursday, October 20, 2011

Manly Meatloaf

Before you turn your nose up at meatloaf, consider this...
1.  Everyone has their own recipe, it's been around for ages and this is likely to be a bit different than your version.
2.  Making small loafs instead of one big one nets you more crusty goodness and reduces cooking time!

We didn't have meatloaf much growing up so this isn't an "old family recipe", it's my own easy version of an old classic.  So fasten your seatbelt for a Monster Meatloaf ride!

What you'll need to start:  1/2 red bell pepper, 2-3 stalks of celery, 1 medium yellow onion (or half of a large one, 2 lbs of ground beef, salt and pepper.  This makes 2 mini loaves.  Simply half or double the recipe to suit your own needs.  

Dice those veggies up so they are all about the same sized dice.  Doesn't have to be perfect, just know it helps everything cook evenly. 

 Heat 1 Tbsp butter plus 1 Tbsp of vegetable or olive oil in a pan.  Saute the veggies until they are soft and onions are translucent.


Once the sauteed veggies are done and cool enough to handle, toss them into the ground beef. 


Add 2 slightly beaten eggs and 3/4 cup of dry bread crumbs to the meat and mix well.  Form into two rectangular loaves to fit your pan.  You can use a loaf pan to shape them (line with plastic wrap for easy removal) or hand shape them.   I've used the broiler pan from my toaster oven and lined the bottom with foil for easy cleanup.  Anything I can bake in the oven can be made in my toaster oven.  It's smaller so it uses less energy.  I'm always in favor of being green. 

Now, for the topping!  I mix two parts ketchup to one part yellow mustard and brown sugar.  Mix it well then taste.  If it's too sweet for your taste add more mustard.  If it's too tart add more ketchup or brown sugar for added sweetness.  It's at this point I add cayenne pepper to the mix.  Hubby loves things HOT (that's why he married me, hehehe).  


Cover the loaves with a thin layer of the sauce and bake at 350 for 1/2 hour.  Pull it out and put another coating of sauce on the loaves then return it to the oven.  Do this every 10 minutes until the loaves are cooked to 140 degrees.  

By adding the sauce in increments it has a chance to firm up and create that crusty goodness mentioned earlier.  The "oh my goodness this is awesome" factor will be kicked up a few notches!
The "crust" is so good my husband and I fight over the end pieces (they have the most crust).  By making two small ones we get four ends instead of just two.

I always make more than needed so I'll have leftovers.  Hubby loves finding meatloaf sandwiches in his lunch bag the next day!  There is typically excess ooey gooey sauce which I spread on the sandwich bread instead of mayo.  If there isn't enough sauce, I use a little of the mayo for the sandwich.  It's delish either way. 

If you try this one, I'd love to read about it!

Wednesday, October 19, 2011

No Fuss Butternut Squash Soup in the Crockpot

After researching several recipes for butternut squash soup on the internet and in cookbooks,  I was left thinking..."there has to be an easier way".  Well after a little experimentation, I arrived at a recipe that made my husband do his happy dance.  Whenever that happens, I know I have a winner!  Plus there's no need to saute anything first and for all you health nuts out there, no cream!


    Ingredients you'll need:  1 1/2-2 lbs butternut squash, 2 green apples (I used granny smith), one large onion, 2 qts chicken broth, 3 Tbsp butter, 1 tsp allspice, 1/2 tsp cinnamon, cayenne to taste (optional)

    If you've never purchased or handled the squash before, prepare to blush.  Suffice it to say it has a certain phallic quality to it. 

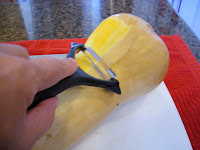
    Wash and peel it first
     I have this handy dandy tool I got from the Pampered Chef.  It's a peeler with teeth.  It's great for peeling veggies with thick skins and won't slip.   (I'm a consultant so if you'd like one, I can help you with that and many other items!)  A regular peeler will work but you'll work much  harder at it.  When peeling, you'll see these green lines in the squash.  Just peel a couple more times and they will come right off.
     Once it's washed and peeled, you're ready to rock!  Be sure to keep a firm grasp on it.  Butternut squash is hard to cut, so use a good, sharp knife.  Cut off the ends, then cut it where the long penis looking portion begins to widen.  Stand both pieces on their flat ends and slice in half lengthwise. 
     At this point, clean out the seeds and stringy part.  Another handy tool is shown.  One side has teeth on it, great for hulling strawberries.  It's great for doing small jobs like cleaning the squash too.  The other end with the hoop is a melon baller.  It's two, two, two tools in one! 
     Finally, slice into strips that can be cut into thinner strips and cube them.  It will take a little muscle but the payoff is worth it!  Cube the apples and onion as well.  
     I used a crockpot to cook the soup.  This recipe fits my four quart crock perfectly!  Put all the chopped up goodies in the pot along with 2 quarts of chicken stock. 


    Add capLet this baby cook for 3-4 hours on high.  You can program your crock for a longer cooking time if you'd like.

     
    If you don't have an immersion blender, consider getting one!  They run about $30-40 and are worth their weight in gold.  Sure beats having to puree batches of soup in the food processor plus cleanup is so much easier!When the squash and veggies are tender, stick the immersion blender in the pot and puree away!  Be sure the openings by the blade are below the liquid line.  If not,  you'll not only be wearing the scalding hot soup but your kitchen will have a fresh coatof pulp all over the place!  
     

    When you're done pureeing the soup, add the allspice, cinnamon, butter and cayenne if you're using it.  When the butter is all melted, it's ready to serve. 

    For extra pizzazz, in a hot pan, toss some thyme leaves in hot melted butter and throw in cubed bread until toasted.  Put the croutons in each soup bowl and serve.

    Do your happy dance!


    Sunday, August 28, 2011

    Impersonating Barbeque Chicken

    Recently my husband and I made a road trip from our home in Colorado to the central part of the great San Joaquin Valley in California.  The drive took us thru the southern part of Wyoming, central Utah, northern Nevada and California.  Since this is a food/cooking blog that's what I'm writing about the trip...the food! 

    Our trip wasn't exactly planned, we packed a suitcase each, a sack lunch and hit the road.  We spent our first night in Elko, NV where fresh ingredients weren't exactly plentiful.  I had a hankering for chicken and the restaurant we went to (it was the special that night) was completely out.  No chicken for me, not baked, roasted or fried. ;-(  Of course this made me want chicken even more.  So the next evening when we finally made it to our destination, we went to a local brew pub we enjoy and I ordered the special that evening, sweet & sour, barbecue chicken!  I was so looking forward to this meal.

    And so my rant begins...

    What do you envision when you think "barbecue chicken"?  I'll tell you what I envision and it's this:  Chicken pieces still on the bone, crisp skin glazed with a slightly set sauce, tender juicy meat that pulls off the bone so easily your toothless Granny could do it and another piece on the plate to relive the experience.  Then after savoring these succulent barbecue beauties, licking my fingers to get every drip of goodness! 

    The anticipation of my envisioned chicken was almost to much to bear.  Then we spotted our server, bringing forth my much anticipated meal.  And there before me lay two dry chicken breasts,  no bone, no skin and sauce squirted from a bottle all over them.  To say I was disappointed would be a gross understatement.  I was actually mad!   I wanted to have the place cited for false advertising.  Barbecue chicken is not chicken breasts swimming in sauce.  Adding insult to injury (remember this was a beer pub) I ordered a specialty apple beer on tap and I didn't even like it!

    I'm happy to report I've had good chicken since both unfortunate evenings but the horrible memory remains.   If you're going to take anything away from this post, remember this:  It's OK to be creative with food descriptions but please don't misrepresent!  If you do, I'll call the food police on you!
      

    Friday, August 12, 2011

    Start spreading the news.........New York , New York!

    What do you do with a New York Steak when it's too big for one person but not quite big enough to feed two?  I'll tell you what I did, I  asked my friend Danielle, the trained chef!  She suggested broccoli beef.  Sounded great, but I'd never even attempted to make it before.  Did that stop me?  Oh, hell no!  I already had broccoli and all I really needed was oyster sauce.  Granted, oyster sauce is not a staple in my kitchen,but I love trying new ingredients in my cooking.   I've always been tempted to buy it and today was the day!

    Let me just say, the broccoli beef was easy to make (my favorite type of recipe) and it's definitely a keeper!  Jim (my guinea pig... uh, I mean my loving husband) completely cleaned his plate and said he'd like to have it again.  Always a good sign. 

    There are two or three ingredients you might not normally have in your pantry but if you buy them for this dish, I promise you'll use them again.  For me it was the oyster sauce.  I had all the rest of the ingredients on hand, so I spent  $4 on a new ingredient.  I'll use the oyster sauce again, so I haven't wasted any money.  Yes, it's true, I'm even a tight wad in the kitchen!


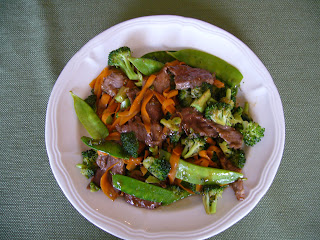
    To ribbon the carrots, I simply peeled one then used the same potato peeler to make the pretty strips.  Isn't the dish gorgeous?  Yes, that is a picture of my dish.  All dishes and pictures of food I post here I made and plated.  I will never post a recipe I've not made myself.  Here's all  you need:
    • 1/3 cup oyster sauce
    • 2 teaspoons toasted sesame oil
    • 1 teaspoon soy sauce
    • 1 teaspoon sugar
    • 1 teaspoon cornstarch
    • 3/4 -1 lb New York steak, thinly sliced
    • 3 tablespoons vegetable oil, plus more if needed
    • 1 thin slice of fresh ginger root
    • 1 clove garlic, peeled and smashed
    • 1 pound broccoli florets
    • 1 carrot peeled into ribbons
    • 1 handful of snow peas

    1.  In a bowl, mix together well the oyster and soy sauce, sesame oil, sugar, and cornstarch. Add the sliced steak and coat well.  You can marinate it in the refrigerator or go straight to cooking preparation.
    2. Heat veggie oil in a large skillet or wok.  When it's at medium-high heat, add in the ginger and garlic. Let them fry in the hot oil for about 1 minute, or until fragrant to flavor the oil.  Remove and discard the garlic & ginger.   Add the broccoli to the flavored oil and stir/toss until bright green and slightly tender.  This will take about 5-7 minutes.  Add the snow peas and carrot ribbons, toss and cook another 2-3minutes. Remove the veggies from the pan and set aside. 
    3. Pour a little more oil into the wok, if needed.  Add the the beef.  Stir and toss it with the marinade until the sauce forms a glaze on the beef, and the meat is no longer pink, about 5 minutes. Return the cooked broccoli to the pan and stir until the meat and broccoli are coated and heated through, about 3 minutes.  Plate that puppy and serve!
     Not only is this dish very tasty but it's so pretty to look at too!  I find Asian dishes are all about the fresh ingredients.  The sauces and/or spices are used sparingly but pack a punch of flavor.  This one was so easy I can't wait to see what else I can make the the rest of my oyster sauce!  I must confess I even bought a bottle of fish sauce for future experimentation.  Readers, you've been warned!


    TIP:  This would be great served with or over rice!  Without rice this was a full meal for two of us.  If we added rice we could have easily stretched it to four servings.


    TIP:  If you have an Asian grocery store in your community, pay it a visit!  Not only will you discover new and interesting foods and ingredients, you'll also find items you already use at much better prices!  Their quality of sauces are much better and usually less expensive.  I also find great prices on produce!   


    Give this dish a try and let me know what you think! 

    Monday, August 8, 2011

    Saturday's salad!


    This past Saturday we had a few friends over for dinner.  We ate, laughed and enjoyed copious amounts of adult refreshments.  While the evening was a great time, one memory that keeps floating back to me were the compliments on the salad.  Mind you, while we had perfectly grilled New York steaks (Thanks Jim!), sweet corn on the cob and fresh grilled zucchini for dinner, it was the salad that caused the most buzz.  OK, OK, the wine was the biggest hit but this is a food/cooking blog, so work with me!

    The salad really did get several favorable comments so I want to share it with you.  The best part?  It's so easy to prepare, has simple ingredients and you can make a ton of it or just a little bit.  However, the real star of the salad is the dressing.  Yes, the dressing!  But before we dress this beauty, lets make the salad.  Only a few easy to find ingredients are needed.  The amount shown here will serve four people.  You can double up or scale back as much as you need for accommodating your own crowd.

    2 cups of of Napa Cabbage, shredded
    1 cup red cabbage and green cabbage, shredded
    1 red bell pepper, diced
    2 green onions, thinly sliced
    1 handful of chopped fresh cilantro
    1 large carrot, julienned

    Mix all together and it's ready to be dressed or dressed up!  The dressing consists of only three ingredients and boy do they pack a punch!  The best thing to remember where the dressing is concerned is this:  3, 2, 1

    3 Tbsp of soy sauce
    2 Tbsp of rice wine vinegar
    1 Tbsp of toasted sesame oil

    That's it!  Shake well then mix into the salad. Keep in mind, this dressing is strongly flavored, so a little goes a long way!  Don't overdress your salad.

    If you want to add substance to the salad, toss in some diced avocado or chicken chunks.

    For my dinner party I put 2-3 thin slices of seared Ahi on top of each serving.  I bought one average Ahi tuna steak (about $3.00 worth).  I sprinkled it with kosher salt, coarse ground pepper and sesame seeds.  I seared it in a pan until a white line appears on the bottom (where it's been cooked), flip it over for another white line then remove from the heat.  The center should remain raw.  I then cover and chill it in the refrigerator until I'm ready to slice and serve it.  I served it on a white plate so the colors of the salad pop!  Simple ingredients that pack a big punch are always a hit.

    This is a great picnic salad for it's ease of transport.  Store the salad into a large air tight bag with a paper towel inside to absorb excess moisture.  Put the dressing in another small air tight bag.


      When ready to serve, shake then pour the dressing into the big bag with the salad,  mix well and serve.  Prepare yourself for culinary accolades! 

    Since I had leftover steak (unbelievable, I know!) and planned ahead by making more salad than I needed for the evening, I already had the makings for another night's dinner.  I just dressed enough salad for a meal portion serving, sliced the leftover steak and added avocado.  Presto, a beautiful, filling yet light dinner ready in less than five minutes!  Who says you can't make dinner delicious and beautiful!?!


    Your thoughts and questions are welcomed~!

    Thursday, August 4, 2011

    Morning Mochas and Lattes

    I used to be one of those "Gotta have a Starbuck's Coffee" people who made a special stop on my way to work, stood in line for five minutes, paid $4 for a shot of caffeine and then waited another five minutes for it to be made.  Then something magical happened!

    In 2007 my hubby and I moved from northern California to northern Virginia (I know, we have a thing for the North).  As it was going to take 6-8 days for our worldly possessions to make their way across the country, we needed something to do and a place to stay for a week.  This is where it gets good! into play.

    The people who used to live across the street from us in California had moved to the Florida Keys and invited us to spend the week with them.  Let me tell you, it was rough!  Falling asleep to lapping waves, sunny days with light breezes, eating fresh seafood almost daily.   The only thing that saved us was our introduction to Cuban cafe' con leche.  Our host and former neighbor is Cuban and this type of coffee is a staple in her house.  We had it every morning we were there.

    As soon as we settled in at our new home in Virginia, I went out and bought one of those low tech, stove top espresso makers.  Yes, it's ESpresso, not EXpresso!  You can get them anywhere from $15-$90, it just depends on where you buy it. 

    Morning lattes and mochas became a ritual in our house from that point on.  We discovered some unexpected benefits and savings in the process.  My hubby could linger at home 10 minutes longer because there was no longer a need to wait in line at a coffee shop.  I always have coffee and milk in the house so special ingredients weren't an issue either.  One $3.59 / 10 oz can of Bustelo Cuban Espresso will net you 10-20 cups of your favorite latte or mocha!   It takes about one minute to get the coffee going and you can be reading the newspaper or throw a load in the washer while it does it's thing.  When it's done it whistles and you know its time for a little caffeine heaven.

    The stove top espresso maker has three parts:  The base water receptacle, the coffee holder and the top.  Unscrew the top from the bottom, remove the coffee holder and fill the base up to but not over the air hole.  Place the coffee holder back into the base.  Fill the coffee holder with two tablespoons of espresso, do not pack.  Screw the top back on and put that puppy on the stove on medium high.

    It will take 2-3 minutes, then your espresso will magically fill the top portion of the pot.  To make your own cup of heaven, simple do the following:

    While the coffee cooks, heat up one cup of milk (skim, 1%, 2%, whole or soy) either stove top or in the nuker (microwave).  When the milk is heated, add sugar to your taste.  If you're making a latte add 1/4 teaspoon of vanilla extract.  I guess you could use imitation, but life's to short for me to do so.  Pour in the coffee and viola!  You have 1 3/4 cups of vanilla latte heaven.  If a mocha is more your speed, do the same but skip the vanilla.  Use chocolate milk or soy milk and add a dash of ground cinnamon.  Play with the vanilla/cinnamon/sugar to suite your individual tastes.  I promise you, once you find your perfect amount, you'll never stand in a long line for coffee again!


    One more thing, you can find these espresso makers almost anywhere.  World Market, Target, Crate & Barrel, BB&B...all over!  Questions?  Just post 'em!  Enjoy!!! 


    Tuesday, August 2, 2011

    The Cook That Could

    Hello, my name is Amelia and I'm a recovering boxed cake mix user.  Scary, I know, however that's not the worst of it.  Allow me to elaborate.  My earliest and most horrific memory of a cooking disaster goes back to my teen years.  My Mom had not yet come home and dinner needed to be made for the family.  I was panic stricken as I had no clue what to do or where to start.   I  quickly pulled up my big girl panties, grabbed a cup of "I can do this" out of thin air and proceeded to open up a can of sweet corn.   I then proceeded to stare at it, unable to move beyond the spot on which I stood.  Who knew canned corn could be so daunting?  Before any other tragedy could befall me, my Mom arrived and saved the day!  Whew!!!

    That nightmare of a daytime experience, along with a few others you'll hear about in future blogs, have transformed me.  I've been inspired by my Mom, Dad, and so many others, too numerous to mention.  Because of them, collectively, I can now cook many things in several different cuisines.

     I have other interests besides cooking.  I sing and play the guitar.  I've been a Toastmaster for some 15 years.  I'm the mother of two adult children (is that an oxymoron, or what!?) and am happily married.  I was born and raised in the central valley of California, lived a few years in the metropolitan area of Washington, D.C. and now reside in the suburbs of Denver, Colorado.  Each of these places have added to my culinary experiences in varied ways.  Stick with me and you'll find out how. 

    Now that I've revealed a little bit about me, I hope you will travel with me on this culinary journey of cooking, kitchen do's, dont's and recipes tried and true. 

    Though this inaugural blog contains no recipes or pictures, those that follow will contain useful information.  Those that don't will be filled with my rants and raves, of which I have plenty ;-)

    I've been encouraged by so many to start a blog, I've finally taken the suggestion to heart.  So, hang on, here we go!